
Did you know that over 90% of modern vehicles rely on electronic stability control systems that depend on precise steering input data? This small but critical component helps prevent thousands of accidents each year by ensuring your car responds correctly when you turn the wheel.
Welcome to your complete guide on maintaining your vehicle’s safety systems. We’ll walk you through everything you need to know about keeping these essential features working perfectly. Modern cars are smarter than ever, and proper setup of their electronic components is crucial for safe operation.
This guide is designed for car owners, DIY enthusiasts, and technicians who want to understand the process from basic concepts to advanced techniques. Whether you’ve just completed an alignment, experienced a collision, or are seeing warning lights on your dashboard, this information will help you get back on track safely.
By the end of this article, you’ll have the confidence to handle this important maintenance task or at least understand what your mechanic is doing under the hood. We’ll cover when this procedure is necessary, what tools you might need, and different methods to ensure accurate readings.
Key Takeaways
- Modern vehicle safety systems heavily depend on accurate steering input data
- Proper calibration ensures electronic stability control functions correctly
- This process is essential after wheel alignments or collision repairs
- Both DIY enthusiasts and professional technicians can benefit from this guide
- Understanding the procedure helps you communicate effectively with mechanics
- Warning lights often indicate the need for this important maintenance
- Various methods exist for achieving precise system configuration
Understanding Steering Angle Sensors
Modern cars contain a hidden hero in the steering system that communicates with multiple safety technologies simultaneously. This component works behind the scenes to ensure your vehicle responds correctly to every turn of the wheel.
What Is a Steering Angle Sensor?
Located within the steering column, this sophisticated device constantly monitors your wheel’s position and direction. It contains a microscopic chip that takes precise readings relative to the vehicle’s center line.
Think of it as your car’s way of knowing exactly where you intend to go. The component provides critical data to multiple systems that keep you safe on the road.
Role in Advanced Driver Assistance Systems (ADAS)
This vital component plays a starring role in ADAS technologies. It feeds real-time information to features that help prevent accidents and improve driving comfort.
Your lane keep assist system relies on this data to gently correct your path if you drift. Blind spot detection needs to know your intended direction to function properly.
Even your adaptive lighting system uses this information to pivot headlights around curves. The component sends updates multiple times per second for instant response.
| ADAS Feature | Function | Steering Data Dependency |
|---|---|---|
| Lane Keep Assist | Prevents unintentional lane drifting | High – needs real-time position data |
| Blind Spot Detection | Alerts to vehicles in blind spots | Medium – uses direction intent |
| Adaptive Headlights | Illuminates curves before reaching them | High – follows wheel movement exactly |
| Electronic Stability Control | Maintains vehicle control in turns | Critical – essential for proper function |
Understanding how this small component serves as an information hub helps appreciate why proper setup is essential for vehicle safety.
The Importance of Proper Calibration
The advanced safety features in today’s automobiles depend on accurate data to provide the protection drivers expect. When these systems receive incorrect information, they cannot function as designed.
Many people choose specific vehicles because of their sophisticated driver assistance technologies. They trust these features to work correctly during daily driving and emergency situations.
Impact on Vehicle Safety Features
Proper setup isn’t just a technical detail—it’s essential for safety. Your car’s computer needs precise information to make split-second decisions.
When the data is wrong, driver assist features may malfunction. They could intervene at the wrong moment or fail to help when needed most.
Dashboard warning lights often signal when something isn’t right. These alerts mean critical safety systems might be disabled until the issue gets fixed.
After a collision or significant repair work, resetting becomes crucial. Even small changes to your car’s geometry can affect how systems interpret steering input.
Think of this process as teaching your vehicle where “straight ahead” is located. Without this baseline, every safety feature that relies on accurate direction data becomes compromised.
Investing in correct setup ensures your advanced technologies work as intended. This gives you confidence that your protection systems will perform when you need them.
When Is Steering Angle Sensor Calibration Needed?
Your vehicle’s safety systems communicate constantly, and knowing when they need recalibration is crucial for maintaining protection on the road. Several situations can disrupt the delicate balance of your car’s electronic safety features.
Understanding these triggers helps you stay proactive about vehicle maintenance. This awareness ensures your advanced driver assistance systems function correctly when you need them most.
Post-Alignment and Collision Considerations
The most common time for this procedure is after a wheel alignment. Even minor adjustments to your suspension can change how your car interprets direction data.
Following any collision, regardless of severity, recalibration becomes essential. Impacts can shift components or trigger airbag deployment, both affecting system accuracy.
Post-collision repairs involving structural work absolutely require this reset. Work on the steering column or clock spring replacement also demands attention.
You might notice warning lights related to stability control activating at odd times. Some vehicles show subtle signs like an off-center wheel when driving straight.
Any time your steering or suspension systems receive service, ask about recalibration. This simple question maintains optimal safety system performance.
Overview of the Calibration Procedure
The journey to accurate driver assistance begins with a simple but crucial reset procedure. This process establishes the foundation for all your vehicle’s safety technologies.
Understanding the available methods helps you choose the right approach for your situation. Different vehicles require different setup techniques.
Basic Calibration Steps
At its core, this process involves setting a “zero point” for your wheel position. Technicians position the wheels straight forward to establish this reference.
The system then learns where “center” is located. This baseline allows accurate measurement of turning movements during driving.
Some vehicles may need special equipment like alignment racks. Proper wheel alignment ensures the procedure works correctly.
Using an OBD-2 Scanner vs. Manual Methods
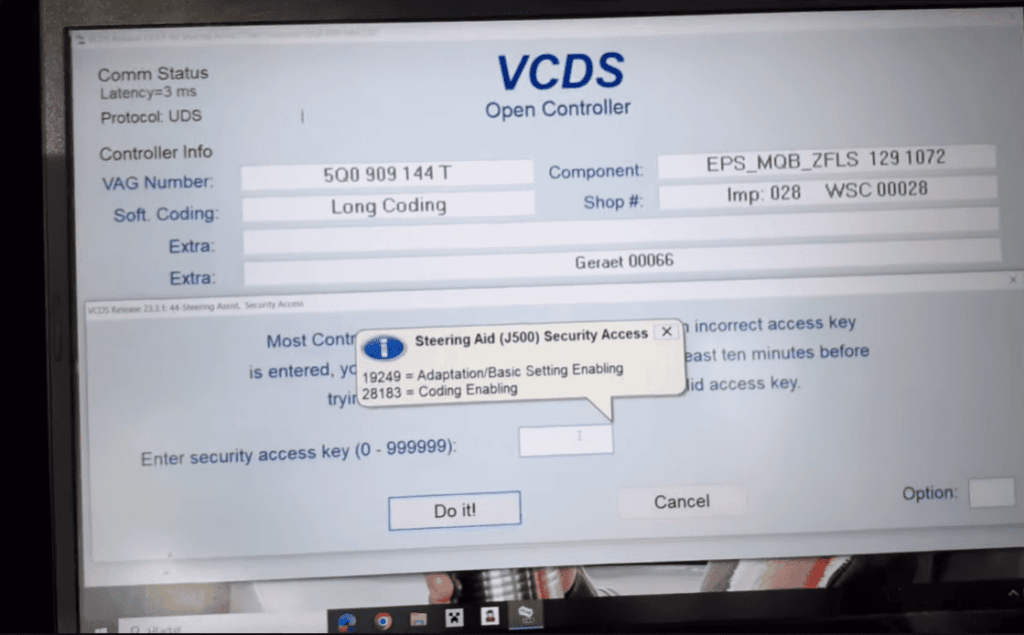
Professional technicians typically use diagnostic tools for this work. These devices access your vehicle’s computer system directly.
Scan tools provide clear feedback about the success of the procedure. They confirm when the system accepts the new settings.
Manual methods work on certain older models. These involve specific ignition and wheel movement sequences.
Newer vehicles increasingly require proper diagnostic equipment. The right tool choice depends on your car’s make and model year.
Steering Angle Sensor Calibration Using a Scan Tool
The right diagnostic equipment can transform a complex electronic reset into a straightforward process. Modern scan tools provide direct communication with your vehicle’s computer system.
This method offers reliable confirmation of successful adjustments. It ensures your safety features receive accurate information.
Step-by-Step Instructions
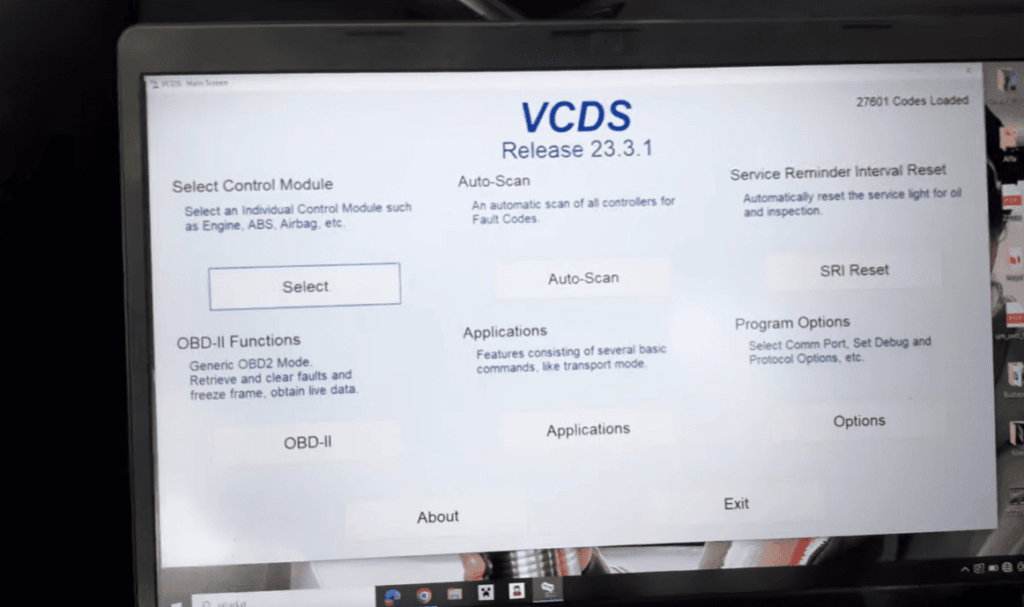
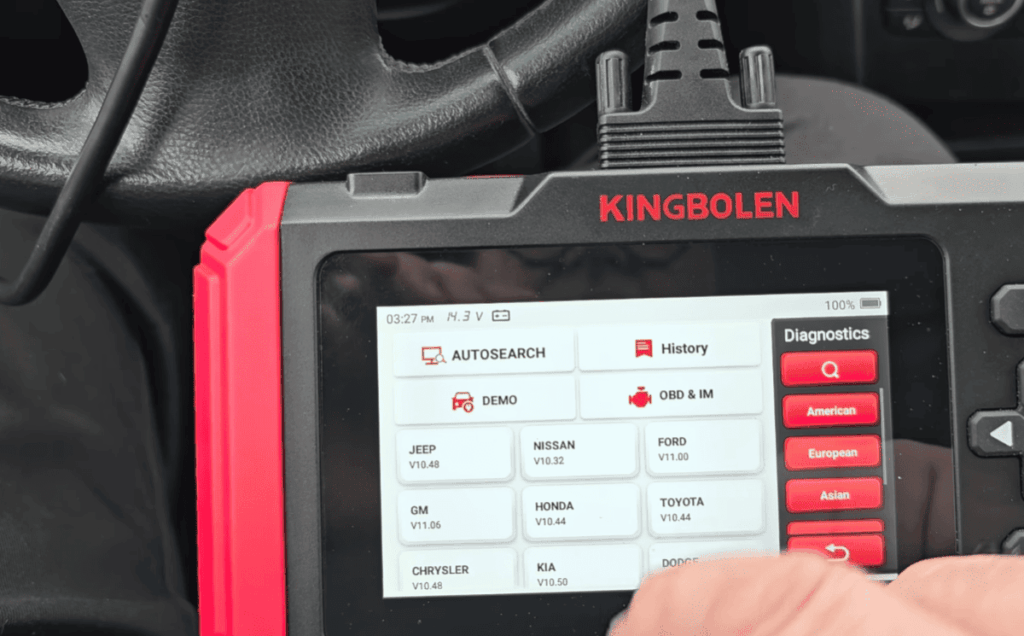
Begin by connecting your OBD-2 scanner to the diagnostic port under the dashboard. Turn the ignition to the “ON” position without starting the engine.
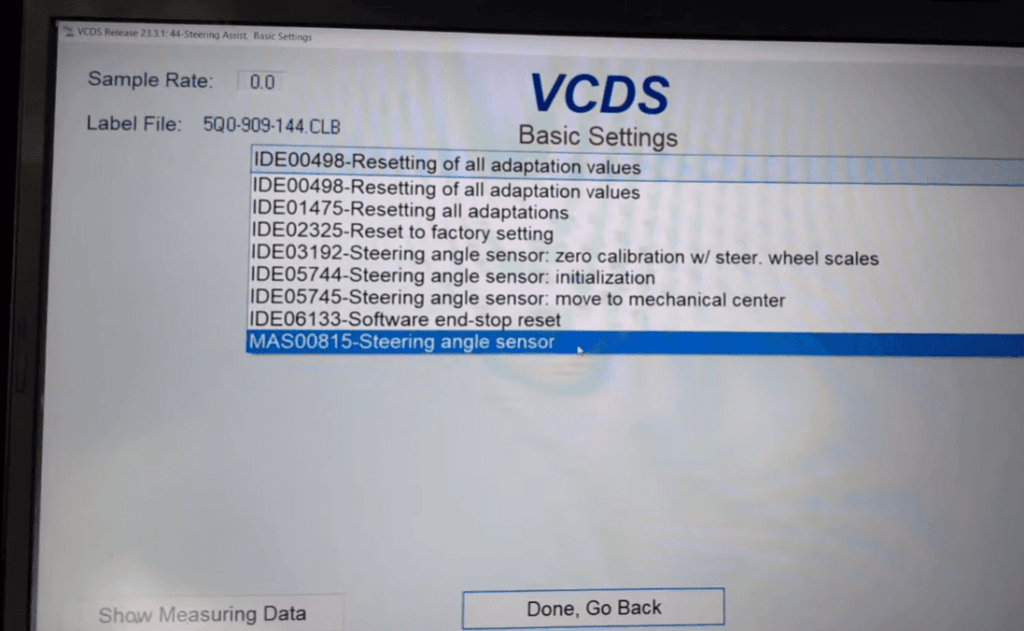
Navigate through the tool’s menu to find the appropriate function. Look under chassis systems or ADAS settings.
Ensure your steering wheel is perfectly centered before starting. The wheels must point straight ahead for accurate reference.
Follow the prompts to clear any existing trouble codes. The procedure typically completes within minutes.
Tips for Ensuring Accurate Readings
Always perform this work on a level surface for best results. Check tire pressures before beginning the process.
After completion, verify the settings by turning the wheel lock-to-lock. Watch the readings return smoothly to zero at center position.
Address any diagnostic codes before attempting the reset. Underlying issues can prevent successful system configuration.
Proper tool selection depends on your vehicle’s make and model year. Newer cars often require specific diagnostic equipment.
Preparing Your Vehicle for Calibration
Before any technical work begins, a few simple preparatory steps can make the difference between success and frustration. Proper setup ensures your car’s computer receives the most accurate information possible.
This foundation is crucial for all the electronic systems that follow. Taking these extra minutes now saves time and ensures your safety features work correctly later.
Importance of Parking on a Level Surface
Always find a completely flat surface for this work. A level garage floor or driveway is perfect. Any incline will affect your suspension’s position.
If you reset the system on a slope, the default center point will be wrong. This leads to inaccurate readings from the very start.
Once parked, straighten your steering wheel as precisely as possible. Your front tires must point directly forward in the straight-ahead position.
Turn your ignition key to the “ON” or “RUN” setting. Do not start the engine. This powers up the electrical systems for communication.
Check your tire pressures to the manufacturer’s recommended levels. Incorrect pressure can slightly change your vehicle’s ride height.
Remove any heavy items from the trunk or cargo area. A weight imbalance can cause the car to sit unevenly.
| Preparation Step | Importance Level | Impact on Accuracy |
|---|---|---|
| Park on Level Ground | Critical | Ensures suspension is neutral |
| Center Steering Wheel | Critical | Establishes correct zero point |
| Turn Ignition to ON | High | Powers necessary electronics |
| Check Tire Pressure | Medium | Maintains proper vehicle geometry |
| Remove Excess Weight | Medium | Prevents uneven suspension load |
This careful preparation phase is a simple but vital part of the process. It sets the stage for a successful reset of your vehicle’s electronic systems.

Manual Calibration Techniques
Many vehicle owners don’t realize they can perform important system resets using basic manual techniques. These methods work well on older models and provide a tool-free alternative to professional equipment.
Before diving into specific procedures, ensure your car is parked on level ground. This preparation step helps achieve accurate results.
Resetting the Sensor with Key and Steering Movements
Start with your key in the “ON” position without starting the engine. Turn your wheel completely to the left, hold briefly, then move it fully to the right.
Repeat this left-right movement at least three times. Move slowly through the full range to help the system recognize its travel pattern.
After completing the turns, switch the key to “OFF” and remove it. Wait a few seconds before restarting your vehicle to check if the reset worked.
Alternative Method: Battery Disconnection Process
If the first approach fails, try the battery disconnection method. This provides a deeper system reset by power-cycling all vehicle computers.
Park on flat ground and open the hood. Disconnect the negative (black) cable first using a wrench, then remove the positive (red) cable.
Wait at least 15 minutes for complete discharge. During this time, you can turn the wheel from left to right several times.
Reconnect the battery cables (positive first, then negative). Start your car and immediately turn the wheel fully left and right three times.
| Method | Best For | Success Rate |
|---|---|---|
| Key & Steering Movements | Older vehicles, quick resets | Medium (varies by model) |
| Battery Disconnection | Stubborn issues, deeper reset | High on compatible models |
| Professional Scan Tool | Newer vehicles with ADAS | Consistently high |
Manual techniques work best on simpler systems. Newer cars with advanced safety features often require professional tools for reliable results.
Troubleshooting Common Calibration Issues
What happens when you’ve followed all the steps correctly but warning lights continue to illuminate your dashboard? Sometimes the reset process doesn’t go as planned, and knowing how to troubleshoot can save you time and frustration.
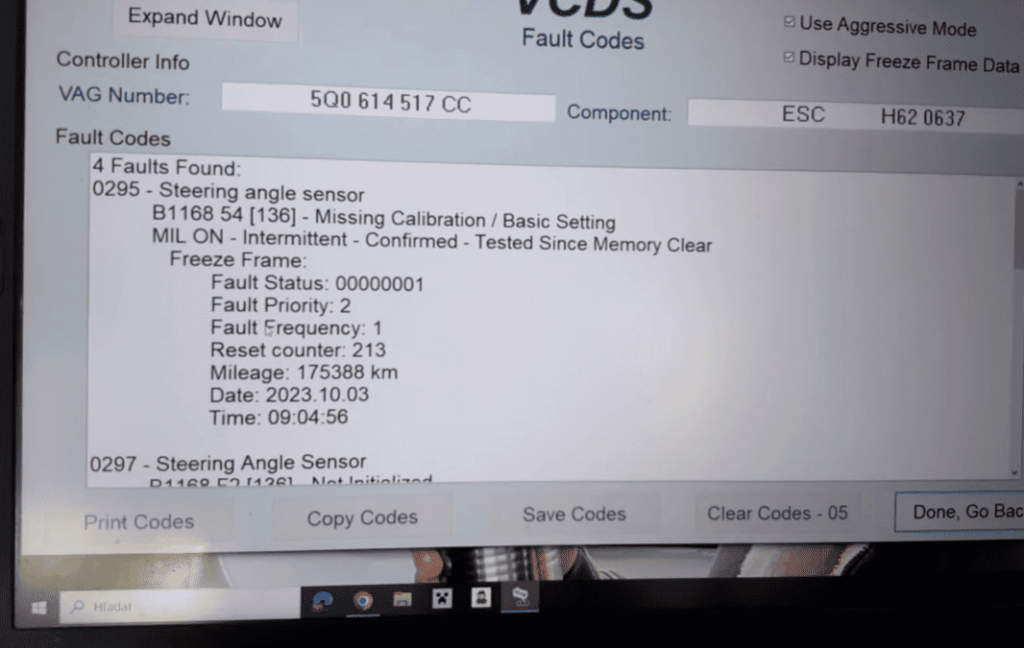
If you see persistent diagnostic trouble codes after attempting a reset, the issue may run deeper than simple configuration. Warning messages that return immediately often indicate actual hardware problems rather than calibration needs.
Dealing with Persistent Error Codes
Here’s reassuring news: the component that reads your wheel position almost never fails electronically. It’s essentially a simple cog with a tiny chip that’s incredibly reliable.
The real culprit behind persistent trouble codes is typically the clock spring. This coiled ribbon cable maintains electrical connection as your wheel turns.
Identifying Problems with the Clock Spring
Clock springs can become damaged or loose, especially after steering column work or airbag replacement. This causes communication loss with the component even though it functions properly.
If your reset seems successful but message alerts continue, suspect a clock spring issue. Have it inspected by a qualified technician for accurate diagnosis.
Other troubleshooting steps include checking all connectors are properly seated and verifying no other diagnostic codes interfere with the process. When warnings persist despite multiple attempts, deeper investigation becomes necessary.
Advanced Calibration for Modern Vehicles
The landscape of vehicle calibration has dramatically shifted for late-model trucks with sophisticated driver assistance. What once involved simple resets now requires accessing multiple electronic systems through specialized diagnostic equipment.
Using IDS and Specific Calibration Tools
Professional-grade tools like Integrated Diagnostic Software (IDS) and Mongoose adapters have become essential. Many enthusiasts discover their aftermarket scanners need specific updates to work with current model year VINs.
For 2023+ trucks with Pre-Collision assist and Evasive Steering features, the procedure evolves significantly. Instead of traditional methods, technicians access the abs module to initialize the IVD sequence.
This process calibrates the Longitudinal Acceleration Sensor, which ties directly to your wheel alignment offset. The abs module serves as the central hub coordinating data between various systems.
After installing suspension modifications or stabilizers, reinitializing multiple module calibrations ensures harmonious system operation. Some advanced users even disable steering assist features for improved feel with upgraded components.
Having the latest software updates and manufacturer-specific tools isn’t just helpful—it’s often essential for successful results on modern truck systems.
Additional Tools and Diagnostic Assistance
Quality scan tools have become increasingly accessible, allowing DIY enthusiasts to perform professional-level diagnostics at home. The right equipment transforms complex electronic work into manageable tasks.
Recommended Scan Tools and Software Updates
Investing in reliable diagnostic equipment pays off quickly for regular maintenance. Entry-level scanners now offer advanced functions at reasonable prices.
Look for tools that receive regular software updates. Manufacturers constantly refine procedures and add new vehicle support.
Popular options include Autel, Launch, and Snap-on devices. These provide comprehensive coverage and detailed system information.
For Ford-specific work, ForScan software offers deep module access. It delivers professional capabilities at a fraction of dealer tool costs.
Always verify tool compatibility with your specific vehicle before purchasing. Not all scanners include the necessary calibration functions.
Modern diagnostic equipment often features automatic update downloads. This ensures you always have current procedures for newer vehicles.
Quality tools represent a smart long-term investment. They quickly pay for themselves compared to repeated shop visits.
Best Practices for Regular Maintenance
Building smart maintenance routines helps prevent small issues from becoming major safety concerns down the road. Consistent attention to your car’s electronic systems ensures they remain reliable when you need them most.
Routine Checks for System Alignment
Make it a standard practice to ask about system reset every time you get a wheel alignment. This simple question maintains optimal performance of your safety features.
Pay attention to your steering wheel position when driving straight. If it sits noticeably off-center, it’s time for both an alignment check and system adjustment.
Monitor your dashboard for warning lights related to stability control. These alerts often indicate when electronic systems need attention.
| Maintenance Interval | Recommended Checks | Importance Level |
|---|---|---|
| Every Wheel Alignment | Verify system reset performed | Critical |
| Annual Check | Monitor warning lights and wheel position | High |
| After Suspension Work | Schedule follow-up system verification | High |
| Every 15,000 Miles | Professional diagnostic scan | Medium |
Keeping a maintenance log helps track patterns and identify when your vehicle needs more frequent attention. Proactive care takes minimal time but ensures your safety systems remain accurate throughout ownership.
Conclusion
The knowledge you’ve gained from this comprehensive guide empowers you to make informed decisions about your vehicle’s safety technology maintenance. You now understand how critical proper system configuration is for modern driver assist features.
Whether you choose DIY methods or professional service, regular attention to your wheel position ensures optimal performance. Remember that dashboard alerts often indicate the need for system reset rather than component failure.
Taking time for proper maintenance protects your investment and, more importantly, your safety on the road. This article has equipped you with the confidence to maintain your vehicle’s electronic systems effectively.
Your commitment to proper care ensures every safety feature works as designed when you need it most. Stay proactive about your vehicle’s maintenance for years of reliable driving.