Did you know that nearly 1 in 5 check engine light diagnoses in modern vehicles relate to oxygen sensor issues? When that warning light glows on your dashboard, it often points to a specific problem that needs immediate attention.
The P2196 diagnostic trouble code indicates your vehicle’s computer has detected an imbalance in the air-fuel mixture. This particular issue occurs when the oxygen sensor before the catalytic converter reads too much fuel in the exhaust system. Your engine’s computer constantly monitors this delicate balance to ensure optimal performance.
When this sensor signal becomes “stuck rich,” it means there’s excessive fuel compared to oxygen in the combustion process. This condition prevents your vehicle’s computer from properly adjusting the mixture. The result can affect your car’s efficiency and driving experience.
Understanding this issue is crucial because it impacts fuel economy, engine performance, and emissions output. Left unresolved, it could lead to failed emissions tests or more serious mechanical problems down the road.
This guide will walk you through identifying symptoms, performing diagnostics, and implementing effective solutions. Whether you’re tackling repairs yourself or want to understand what your mechanic explains, we’ll provide clear, actionable information.
Key Takeaways
- The P2196 code indicates an oxygen sensor detecting too much fuel in the exhaust
- This issue affects Bank 1 Sensor 1, located before the catalytic converter
- Proper air-fuel mixture is essential for optimal engine performance
- Addressing this problem quickly can improve fuel efficiency
- Unresolved issues may lead to failed emissions testing
- Understanding the diagnosis helps in communicating with mechanics
- Several components in fuel and air systems could cause this condition
Overview of the Ford P2196 Error Code
Modern vehicles rely on precise sensor data to maintain optimal engine performance. When imbalances occur, your vehicle’s computer generates specific diagnostic trouble codes to alert you.
Error Code Definition and Explanation
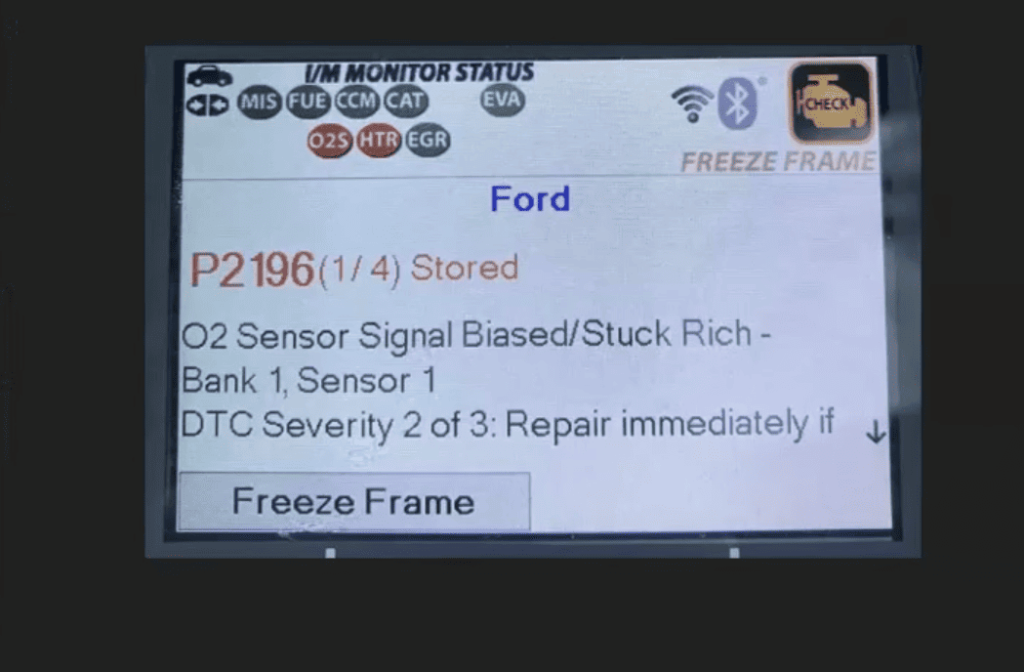
The P2196 trouble code indicates an oxygen sensor reading that’s consistently showing too much fuel in the exhaust. This condition, known as “sensor signal biased stuck rich,” means the sensor before the catalytic converter isn’t functioning properly.
Your vehicle’s powertrain control module expects the bank sensor voltage to fluctuate between 0.1 and 0.9 volts during normal operation. With this specific fault, the voltage gets stuck around 0.2 volts, indicating a rich fuel mixture.
This biased stuck rich condition prevents your engine computer from making proper fuel adjustments. The system cannot maintain the ideal 14.7:1 air-fuel ratio that ensures efficient combustion.
Impact on Engine and Emissions
When your oxygen sensor provides inaccurate readings, several performance issues can develop. Your engine may experience reduced power output and poorer fuel economy.
The stuck rich bank condition leads to excessive unburned fuel entering the exhaust system. This increases hydrocarbon and carbon monoxide emissions, potentially causing emissions test failures.
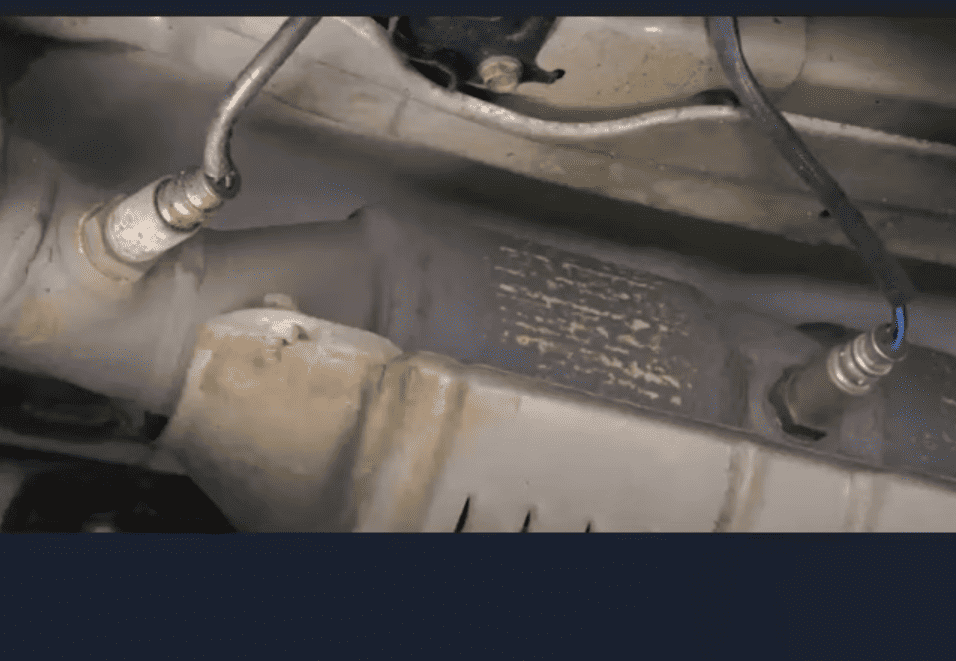
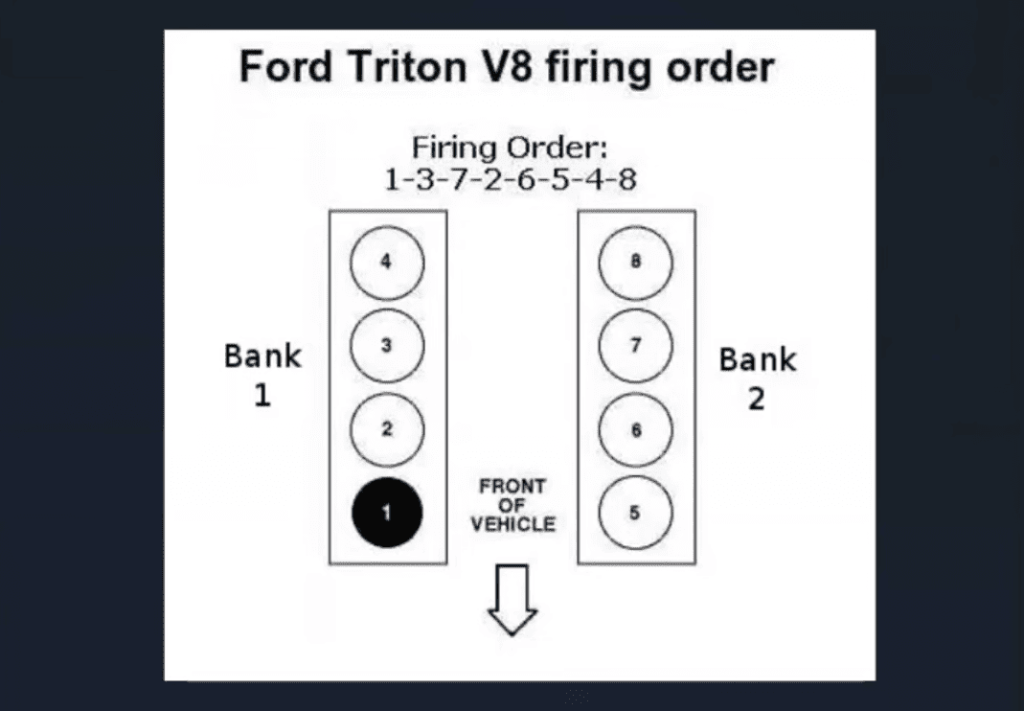
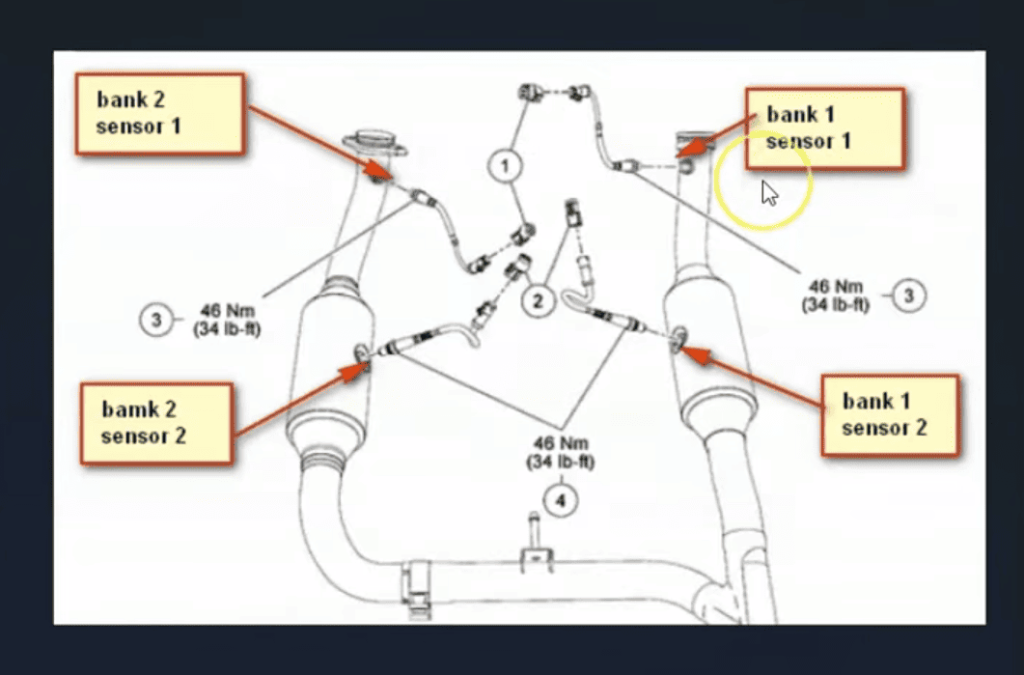
Understanding which sensor is affected helps focus your diagnostics. Bank 1 contains cylinder #1, and Sensor 1 is always located before the catalytic converter.
| Sensor Condition | Normal Operation | Faulty Operation (P2196) |
|---|---|---|
| Voltage Reading | Oscillates 0.1V-0.9V | Stuck near 0.2V |
| Fuel Mixture | Balanced 14.7:1 ratio | Excessively rich |
| Emissions Output | Within acceptable limits | Elevated hydrocarbons |
| Engine Performance | Optimal power and efficiency | Reduced power and MPG |
Addressing this sensor signal biased condition promptly helps restore your vehicle’s performance and emissions compliance. Proper diagnosis ensures you fix the root cause rather than just clearing the code.
Symptoms and Warning Signs
Your vehicle communicates potential issues through various symptoms that become increasingly noticeable over time. Paying attention to these warning signs can help you catch problems early.
Check Engine Light Activation
The most immediate indicator you’ll notice is the check engine light illuminating on your dashboard. This warning light serves as your car’s primary alert system.
Many drivers report this trouble indicator appears intermittently at first. It may flash during cold starts or after refueling before becoming constant.
“The check engine light is your vehicle’s way of saying ‘I need attention’ – never ignore this important warning signal.”
Decline in Engine Performance and Fuel Consumption
You’ll likely experience sluggish acceleration and hesitation when pressing the gas pedal. This performance problem makes merging or climbing hills challenging.
Increased fuel consumption becomes another clear sign. Your car burns more fuel than necessary, requiring more frequent gas station visits.
The oxygen sensor issue affects how your engine manages the air-fuel mixture. This faulty sensor reading leads to these noticeable driving changes.
| Symptom Type | Normal Condition | Problem Condition | Severity Level |
|---|---|---|---|
| Dashboard Warning | No lights illuminated | Check engine light active | High |
| Acceleration | Smooth and responsive | Hesitation and sluggishness | Medium |
| Fuel Efficiency | Consistent MPG | Noticeable decrease | Medium |
| Engine Idling | Steady and quiet | Rough or stumbling | Low-Medium |
Additional signs include rough idling at stoplights and occasional stalling. Some drivers detect strong fuel odors or black smoke from the exhaust.
Common Causes Behind the Error
Multiple components in your engine management system can contribute to the rich mixture condition. Understanding these potential sources helps you diagnose the issue accurately.
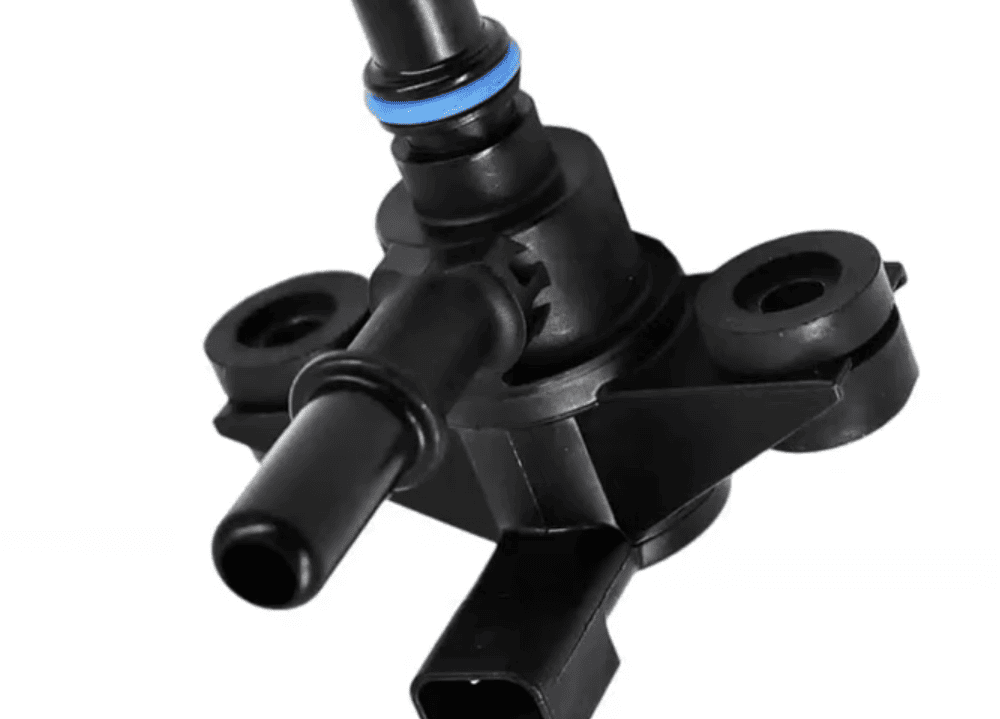
Faulty Oxygen Sensor or A/F Ratio Sensor
The most frequent fault involves the oxygen sensor itself. Contaminants like carbon deposits can affect the sensor‘s ability to read exhaust gases properly.
When this happens on bank 1, it creates inaccurate voltage signals. The air/fuel ratio sensor may also develop similar problems over time.
Fuel Injector and Fuel Pressure Issues
Stuck or leaking fuel injectors deliver excessive fuel into combustion chambers. This creates the rich condition that triggers the diagnostic system.
Fuel pressure irregularities can also cause problems. A failing regulator or pump may force too much fuel through the system.
Wiring, Connector, and Vacuum Leaks
Damaged wiring or a corroded connector can interrupt sensor signals. Heat and moisture often cause these electrical issues.
Vacuum leaks allow unmetered air into the engine. This confuses the computer’s calculations. A malfunctioning maf sensor can also send incorrect data about incoming air volume.
Diagnosing the ford p2196 error code
Professional mechanics begin every diagnostic process by connecting to the vehicle’s computer system. This approach ensures accurate problem identification before any repairs begin.
Using a Diagnostic Scan Tool
Start by plugging your scan tool into the OBD-II port. This device reads stored information from your car’s computer.
Check for multiple trouble codes that might appear together. Related issues often provide important clues about the root cause.
Interpreting Sensor Data and Freeze Frame Analysis
Freeze frame data shows exact conditions when the problem occurred. This includes engine temperature, speed, and fuel values.
Live data monitoring reveals real-time sensor behavior. Watch how readings change while the engine runs.
| Data Type | Normal Reading | Faulty Condition | Diagnostic Significance |
|---|---|---|---|
| O2 Sensor Voltage | Rapid 0.1V-0.9V oscillation | Stuck near 0.2V | Confirms rich mixture detection |
| Fuel Trim Values | Near 0% adjustment | Negative percentages | Shows computer compensation attempts |
| Associated Codes | None or unrelated | P2195, P2197, P2198 | Indicates system-wide mixture issues |
| Sensor Response Time | Instant changes | Slow or no response | Reveals sensor deterioration |
Advanced diagnostics might involve creating temporary vacuum leaks. This tests how the system responds to added air.
Take your time reviewing all available information. Rushing through this process often leads to incorrect diagnoses.
Step-By-Step Troubleshooting Guide
A methodical diagnostic process can save you time and money when addressing sensor-related issues. Following a logical sequence helps identify the true source of air-fuel mixture problems.
Checking MAF Sensor and Oxygen Sensor Readings
Start with a thorough visual inspection of your maf sensor. Look for dirt, oil contamination, or damage to the sensing element.
Examine the oxygen sensor on the first bank carefully. Check for physical damage or excessive carbon buildup that affects readings.
Use your scan tool to monitor short and long term fuel trim values. Compare maf readings against manufacturer specifications.
Inspecting Wiring, Connectors, and Vacuum Lines
Carefully examine all wiring leading to both sensors. Look for rubbed insulation or melted wires from heat exposure.
Check each connector thoroughly for proper seating and corrosion. Ensure pins are clean and connections are secure.
Perform systematic vacuum line inspection. Test for leaks using carburetor cleaner while watching for RPM changes.
| Diagnostic Method | Complexity Level | Effectiveness | Tools Required |
|---|---|---|---|
| Visual Inspection | Beginner | High for obvious issues | Basic hand tools |
| Sensor Data Monitoring | Intermediate | Excellent for patterns | Scan tool |
| Vacuum Leak Testing | Intermediate | Good for air intake issues | Carb cleaner, safety gear |
| Component Swapping | Advanced | Definitive for sensor faults | Specialty tools |
Document each step of your troubleshooting process. This systematic approach prevents overlooking potential causes and ensures accurate diagnosis.
Tools and Techniques for Accurate Diagnosis
Accurate vehicle diagnosis requires more than just intuition—it demands proper tools and systematic testing methods. Having the right equipment transforms complex issues into manageable problems.
Employing Digital Volt/Ohm Meters
A digital volt/ohm meter (DVOM) is essential for electrical testing. This versatile tool helps verify circuits and check sensor resistance values.
When testing oxygen sensor circuits, carefully back-probe connector terminals while the engine runs. This allows voltage measurement without disrupting operation. Check for shorts to ground, power issues, and open circuits.
Compare all readings against manufacturer specifications. Different vehicle models have unique acceptable ranges.
Conducting Fuel Pressure and Injector Tests
Fuel pressure testing is critical for diagnosing rich conditions. Connect a quality pressure gauge to the fuel rail test port.
Measure both static and running pressure under various loads. Compare results with factory specifications. High pressure indicates regulator or return line issues.
Use specialized tools to test injector resistance and spray patterns. A noid light checks electrical signals to each injector.
Allocate sufficient time for thorough testing. Rushing often leads to misdiagnosis. Most professionals spend 30-60 minutes on proper diagnosis.
Repair Solutions and Component Replacements
Once diagnosis is complete, targeted component replacement becomes the key to resolving persistent sensor issues. Proper repairs address the root cause rather than just clearing temporary warnings.
Replacing Faulty Sensors and Correcting Wiring Issues
Always choose high-quality OEM parts when replacing oxygen sensors. Aftermarket alternatives often fail prematurely.
Use proper tools for sensor removal. Apply anti-seize compound to new sensor threads. Torque to manufacturer specifications.
Wiring repairs require careful attention. Solder connections properly and use heat-shrink tubing. Route repaired wiring away from heat sources.
Reprogramming PCM and Inspecting Related Modules
The PCM may need reprogramming with updated software. This requires specialized equipment and calibration files.
After PCM replacement, reprogram with VIN-specific data. Allow the system to relearn through several drive cycles.
Inspect related control modules for proper communication. Ensure all engine management components work together.
Addressing Vacuum Leaks and Intake Manifold Concerns
Vacuum leak repairs vary by location. Simple hose replacements are straightforward. Intake manifold gasket leaks require more extensive work.
Inspect the manifold itself for cracks. Plastic intake components can develop stress fractures over time.
Check the entire intake system comprehensively. Include throttle body and PCV valve inspection.
| Repair Method | Complexity Level | Tools Required | Success Rate |
|---|---|---|---|
| Sensor Replacement | Moderate | Oxygen sensor socket, scan tool | High (90%) |
| Wiring Repair | Intermediate | Soldering iron, heat-shrink tubing | Excellent (95%) |
| PCM Reprogramming | Advanced | Specialized programming equipment | Very High (92%) |
| Intake Manifold Repair | High | Torque wrench, gasket set | Good (85%) |
After completing repairs, clear all diagnostic trouble codes. Perform a comprehensive test drive under various conditions. Verify the P2196 error doesn’t return.
Conclusion
Taking control of your car’s diagnostic process leads to more informed decisions and better repair outcomes. The knowledge you’ve gained about sensor signals and air fuel ratio management will serve you well beyond this specific issue.
Remember that thorough diagnosis saves both time and money. When you encounter similar problems in the future, the systematic approach outlined here provides a solid foundation for troubleshooting.
Regular maintenance remains your best defense against recurring issues. Keep your vehicle’s systems clean and well-maintained to prevent future complications.
Whether you handled the repairs yourself or consulted a professional, you’re now better equipped to understand your car’s needs. This knowledge empowers you to maintain optimal performance and efficiency for years to come.